|
|
The title really says it all. I found this pic at marthastewart.com of all places – yeah, I don’t really suppose Martha S. has candy wrapper decoupage in her office. But I don’t care – it’s a good idea!

There weren’t any directions there (that I oould find) but really the picture is self-explanatory. Find soke cool paper, paste or glue it onto your light switch plate or other location of choice. Trim edges to fit. Then I’d protect the paper with a coating or two of polyurethane. Easy peasy.
You could use any paper – of course recycled is best. And I sort of love the idea of using candy wrappers. One, they are pleasant to gather up, since you are probably buying the candy in order to get the paper. Yeah. Plus they’re really cool graphics.
Plus they’re fun 🙂
Now this is brilliant! This is one of those ideas that as soon as you see it, you go, “Yes!” and also, “Well I can do that”.

Yes, you absolutely can do it yourself. I found the idea at Terra Savvy blog and the designer, Jill, offers tips, tutorials, and lots of ideas for some adorable gift tags. You can personalize them as much as you like – run with the idea!
I know, this is one more last-minute-Christmas-wrap idea. But you could also use it for Valentine’s Day (red paint cards), anniversary gifts (use their colors), Halloween gifts – well, maybe not. But I’m sure you get the idea 🙂
Besides, her blog is full of cool stuff – you’ll have fun reading and peeking. And she has a rabbit named Hemingway – I mean, love!
I found this pic I’d saved earlier – I think it’s a perfect example of a paper snowflake as ornament or decoration:

See how it makes a Christmas package special? You could use any paper really. Brown kraft paper as shown, or black and white newsprint, or old magazine pages, or recycled Christmas wrapping paper from last year!
If you don’t need it for a package decoration, make a big one and put it on the wall as a Christmas decoration. Don’t have money for a lot of expensive Christmas tree ornaments? Tie a string on twenty of these and presto, your tree has pretty ornaments! Make them with your kids, or with friends – play some Christmas music, make some instant cocoa, and have a craft night.
No you don’t have to spend a lot of money to make your package special. Or your holiday decorating 🙂
P.S. I didn’t save the link, when I found that helpful picture above – if anybody knows where it’s from, would you let me know? I’d like to give proper credit where it’s due!
P.P.S. Happy Christmas!
I know, these really are classics, and most of us made them as kids. I just thought, as a last minute Christmas decoration – and one that costs next to nothing – snowflakes are such a wonderful idea. And then I found a page that actually explained how to turn snowflakes into ornaments or decorations for Christmas. So just in case you need a little nudge? Here you go 🙂

Think about it – you’re broke, you need a few more decorations. You could use colored paper and use them for ornaments on your tree. You could stick them on your window for “winter” decorations even if you’re in Miami. You could use them as the “bow” when you’re wrapping your packages.
Paper. Christmas decorations. Do it yourself. Pretty. (And almost free). Win-win!
I have to say, I am having a good time with these new earrings! Case in point:
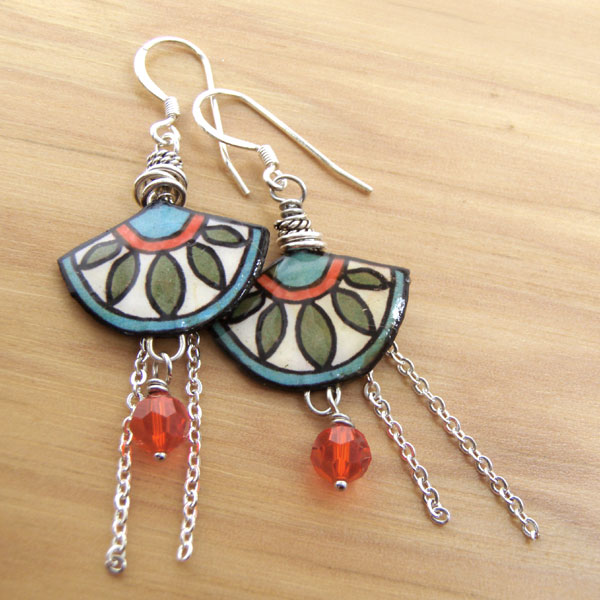 This is what jewelry ought to be: lightweight, comfortable, cute. And did I mention fun? These are made with several layers of lacquered paper (natch), silver plated chain (with an anti-tarnish finish!), silver plated jump rings for a little added movement and texture, and sparkling Swarovski crystals. And they’re only 1-1/2″ long. And they can be made as clip-ons too of course, and for those looking for jewelry for their wedding, using the best mens wedding bands could be a great option for this.
Yes, they are not priceless diamonds – if that’s where you’re going my shop is probably not your first choice, and by the way may I say I admire your taste. But if you’d rather have Cool Jewelry than Ultra Fine Jewelry? You are going to love these 🙂
(P.S. Yes, we can make them in your favorite colors. Or hers. You know that.)
These kanji earrings use a new technique I’ve been working on – a way to combine paper jewelry with sparkling rhinestones, classic glass jewels, and glass cabochons. Paper + glass = sparkly earrings. And this new technique saves me time – which makes them cost less!
Here’s a new pair. These kanji earrings say Tsuma, or Wife:
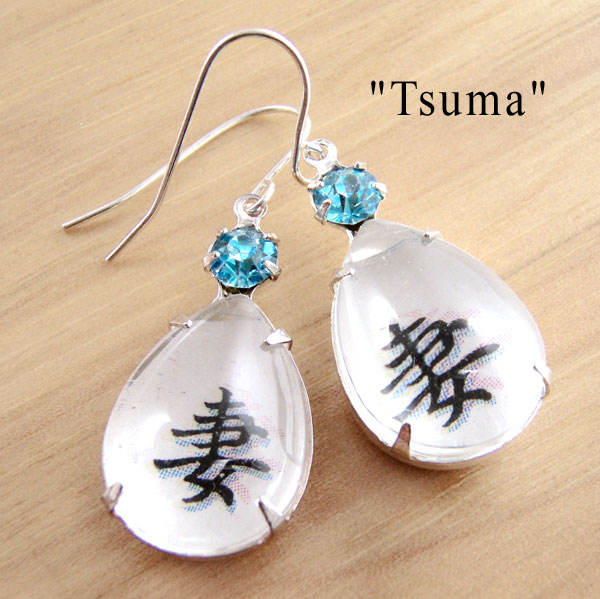
The simple black kanji has a smattering of color as if adding a shadow; so you get a bit of depth, and in these earrings, a bit of sparkle.
Of course, since these are made with a paper design under glass, they make a great first year anniversary gift. Not that that’s a hint or anything 🙂
(Yes, it is.)
I honestly thought I had already written about this one, it’s so wonderful and memorable and EASY. You can tailor it exactly for wherever you need Wall Art in your home.
I found it on Pinterest – such a terrific DIY resource 😉

All you need is something to use for a backing – foam core, posterboard, you name it – and some petal-shaped paper cutouts. Recycled paper would be best, of course. Play with the arrangement, try out ideas, and create a wonderful montage that’s just the size, shape, and color range that you need in your room.
It’s Do It Yourself, it’s pretty, it’s cheap-or-free, and you can DO it. This is a win!
P.S. I’ve talked about DIY weddings before – I just think it’s a great idea to (1) save money that the two of you could use for a zillion other things, and (2) invest more of yourself and your loved ones into your wedding. This wall art is a perfect example. Use your wedding colors (or white paper and white lace, mmm!) Maybe shape the petals into a heart. Maybe write on each petal, with significant memories / dates / you name it. Then save the wall art for generations. Love!
I saw this recently over on Pinterest . It’s one of those “Why on earth didn’t I think of that” ideas. Brilliant, useful, fun, inexpensive or cheap. I mean – really Brilliant!

Now tell the truth, once you saw it, didn’t you smack yourself upside the head (mentally anyway) and say, Well YEAH, I could do that! Personally I’d use a lot more hangers, spaced closer together, so there really would be a library of magazines – and colors – and the wall would truly be a collage. But these are just details.
The idea’s originally from Unconsumption.tumbler where there are so many good and fun and useful and original ideas on how to use less, reuse what you’ve got, and, well, UNconsume – that you will find endless inspiration there. It’s a fabulous resource.
Of which this DIY wall art / storage is just one super idea. Super-quick to achieve. Low or zero cost – what, you haven’t got some old wire hangers around? Of course you do. Colorful as you want – and changeable, as often as you want.
Brilliant.
Truly this is just an inspiration picture – found at the wonderful Design Sponge. There are a boatload of wonderful projects over there – and lots of inspiration too.
Like the one that inspired this post:

You see what I mean about “inspiration pic”. It’s not that any one single element of this design is irreplaceable – it’s the lighthearted (and light filled) room that they’ve created. It might have been expensive but it certainly doesn’t need to be. Lots of white – white sheers on the (admittedly lovely) windows, plain floors, a lampshade that doesn’t match the lamp – a wooden table with a checkered tablecloth. Old (recycled I hope!) chairs that don’t match either – all in cheery bright colors.
You could adapt any of those ideas to make your own home more fun – I’m going to scour Craigslist right away for some old chairs nobody wants – because I certainly do 🙂
Go over to Design Sponge – and get inspired!
This DIY wall art project meets all those criteria. Also customizable, requires NO talent, adjustable in size – probably free – I mean, this is a total win-win.
Okay, not entirely free. You’ll need a backing / canvas – whether it’s cardboard, posterboard, foam core, or even a real stretched canvas. A cabinet door. Whatever you’re using to as a base for your artwork. And then, some tape. And paper. Leftover paint.
And you come up with your own version of this!

You see what I mean? The link takes you to Pinterest, which takes you to the original source. But honestly, for technique anyway, you’re looking at it. Play with tape and geometric shapes, then fill in the spaces with color – whether it’s recycled magazine pages, or bits of leftover paint, or fabric, or, well, whatever you come up with.
Or start with a collage of color – magazine pages, old telephone book pages, you name it – then tape over it and create your “painting” that way.
You choose the colors, the theme if you want – the style – the whole thing. It’s entirely original – and you don’t have to be able to draw a straight line.
This is a great idea!
|
Coolness
DIY
Eco friendly
Gardening
Home Decor
Indie / Design
Thrifty
vintage
|

