|
|
This is something I take for granted – I use (and wear) a lot of ball chains, the simple chains that are used in the military to hold dog tags – and out in the jewelry world, to also hold dog tag pendants. Plus a lot of other necklaces and pendants.
It’s like a lot of things – it’s not hard to do – once you know how. But if you aren’t used to them, they’re probably maddening! They don’t have a typical clasp. Instead, they have a connector as shown in the sketch below.
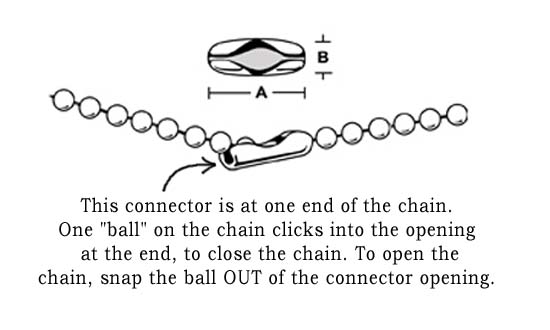
Each end of the ball chain has a simple “ball”. That ball slips into the opening on the connector and presto, your chain is closed! To open the chain, simply snap the ball out of either side of the connector. It sounds complicated – it’s not, really. Take hold of any ball chain and play with it. Twist the ball out of the opening, or snap it, or coax it any way you like. Once you try it, you’ll see what I mean. Sometimes they’re a little snug, and harder to open – but it’ll work. Really.
And you’ll always be able to open a ball chain from then on. Once you know how, you really know 🙂
And if you do need help, drop me a note – we’ll figure it out!
You know that being eco friendly – more eco friendly – is a goal of mine. I think a lot of people are leaning this way. We don’t want to give up our creature comforts or standard of living – but we want to be kinder to the planet. Saving money is nice, too.

This air freshener is a great way to do that. The recipe is from Country Living and of course you’ll find tons of great tips over there.
But this one is so simple! Simmer orange peels (or lemon slices) with rosemary in a pot of water. And if you don’t have the rosemary, just orange peels. One of the freshest, cleanest, loveliest scents on the planet!
Okay, I might be biased – I love the smell of oranges. But it works. Trust me 🙂
Now I know this isn’t a new idea. But the example I found is so fun I thought you’d like to see it 🙂

You can tell how to do it just seeing the pic. Make a design using tape (or anything that would resist paint – hmm, maybe Vaseline-ish stuff that you’ve fingerpainted?) – then spray paint the bottle. Voila! Instant design. Use salvaged / recycled bottles, or tin cans, or plastic canisters.
Use containers with lids and you’ve got storage. Use several small bottles and you’ve got a collection. Use your own colors. This is a totally customizeable, do-able idea, it will only cost a smidge for paint – and it’s fun!
DIY the way it ought to be – cheap, fun, and even useful. Win!
Recycled storage is kind of an ongoing thing with me so I don’t really know if this is Part Four or maybe Twelve. You understand. And this is basic recycled-coffee-can stuff, Recycling 101 to most of us. But it’s so cute, I wanted to share:

Now that would look great on any shelf. They’re using it here to hold plastic bags, and that’s a fine idea (though we are hopefully using way fewer plastic bags these days). But it would work for any kitchen, craft room, or kid’s room storage. Or to hold cotton balls (okay, a lot of them) in the bathroom.
The point is, it looks good. Cover the can with some great fabric or paper (reycled of course) – make one or save them up and do 10 of them to line your craft shelves – or, well, you name it. It works, it’s cheap or free, and it saves some stuff from the landfill!
Paper flowers are just a beautiful – and inexpensive – fun decoration for your house. Aren’t these gorgeous?

If you love dahlias you’ll have fun with this tutorial! I found the pic over on Pinterest and followed it to HGTV.com – it’s a video tutorial and I think you’ll find her directions easy and fun.
Think about it. Easy to do – inexpensive – and of course you can choose your colors, and patterns, and how big or small. This is what DIY is all about – to make it just the way you like it!
PS And hey, if you’re picking your paper anyway – why not grab a stack of old magazines? Great color and you can recycle *and* create great flowers. Just sayin!
I couldn’t help it, I had to share. I just saw another example of actually useful do-it-yourself storage using tin cans. Convert your central desk drawer or kitchen junk drawer to a place where you can actually find things!

So – recycled tin cans, which is good. Easy to do – ditto. Actually useful – yes!
I’d probably paint the cans, just because I think it’d be cooler if they were all black or bright turquoise or something. But that’s just me. Either way – useful storage and do-it-yourself organization. And recycling. And free.
I found this helpful pic over at Shelterness Blog which has a ton of useful, fun ideas for how to make your home work better and be more you. It’s a great resource – and any place that helps us organize, and recycle, and looks good at the same time – this is a win!
Recycle – reuse – rethink. That’s what we want to remember. And when I saw these adorable paper flowers, that combined all those ideas – and they’re easy, and fun, and cute? I figure this is an Academy Award worthy great idea!

I found these wonderfulicious flowers on the Billie Monster blog which is full of wonderful how-to ideas (including jewelry, you’ll love it!) For the flowers, Billie even included a template and how-to instructions – though I have to say, with her wonderful pics you really don’t need the instructions – you can adapt the idea to any recycled paper.
These flowers? Just think how you could customize these for your house. Make a bouquet scattered on the focal wall above your couch, or in a nook above the baby’s crib. Or, well, anywhere you want a pretty accent that can be in exactly the colors and dimension you want.
And: if you’re having a DIY wedding (and yay for you!) – a wall or nook of these flowers, all in whites or your wedding colors, would be lovely. Maybe each of your guests could sign one! Then save them, pressed in a memory book.
This is the best of DIY, and pretty cool recycling too. Think about it: Recycle the paper. Reuse the pages. Rethink how they’re used. And create a really cool decoration for your house – or your wedding – at the same time.
Win!
Now this is brilliant! This is one of those ideas that as soon as you see it, you go, “Yes!” and also, “Well I can do that”.

Yes, you absolutely can do it yourself. I found the idea at Terra Savvy blog and the designer, Jill, offers tips, tutorials, and lots of ideas for some adorable gift tags. You can personalize them as much as you like – run with the idea!
I know, this is one more last-minute-Christmas-wrap idea. But you could also use it for Valentine’s Day (red paint cards), anniversary gifts (use their colors), Halloween gifts – well, maybe not. But I’m sure you get the idea 🙂
Besides, her blog is full of cool stuff – you’ll have fun reading and peeking. And she has a rabbit named Hemingway – I mean, love!
I found this pic I’d saved earlier – I think it’s a perfect example of a paper snowflake as ornament or decoration:

See how it makes a Christmas package special? You could use any paper really. Brown kraft paper as shown, or black and white newsprint, or old magazine pages, or recycled Christmas wrapping paper from last year!
If you don’t need it for a package decoration, make a big one and put it on the wall as a Christmas decoration. Don’t have money for a lot of expensive Christmas tree ornaments? Tie a string on twenty of these and presto, your tree has pretty ornaments! Make them with your kids, or with friends – play some Christmas music, make some instant cocoa, and have a craft night.
No you don’t have to spend a lot of money to make your package special. Or your holiday decorating 🙂
P.S. I didn’t save the link, when I found that helpful picture above – if anybody knows where it’s from, would you let me know? I’d like to give proper credit where it’s due!
P.P.S. Happy Christmas!
I know, these really are classics, and most of us made them as kids. I just thought, as a last minute Christmas decoration – and one that costs next to nothing – snowflakes are such a wonderful idea. And then I found a page that actually explained how to turn snowflakes into ornaments or decorations for Christmas. So just in case you need a little nudge? Here you go 🙂

Think about it – you’re broke, you need a few more decorations. You could use colored paper and use them for ornaments on your tree. You could stick them on your window for “winter” decorations even if you’re in Miami. You could use them as the “bow” when you’re wrapping your packages.
Paper. Christmas decorations. Do it yourself. Pretty. (And almost free). Win-win!
|
Coolness
DIY
Eco friendly
Gardening
Home Decor
Indie / Design
Thrifty
vintage
|

