|
|
This is a super easy do-it-yourself project – and an inspiration for more ideas, too. I found this over on Pinterest. And if you think I am totally in love with Pinterest, you are right! I’ve linked to Liina O’s “Homemade” page and she has found tons of good ideas, go peek!
As shown here, this is a fun, decorative bowl:

This cute bowl would be a great accent in the family room, and a fun project to do with the kids. But, I do have to add, it could be a little time-consuming. Rolling up the magazine pages (gluing them maybe?), then cutting them – that could take a bit of patience.
So what I’m proposing is adopting the idea. Blow a balloon up to a nice chubby round shape. Use thinned glue or wallpaper paste, to apply torn strips of magazine pages, old brown paper bags, or newspaper pages, onto the surface. Keep layering them. (Note: the wallpaper paste could be flour-and-water, super cheap and non toxic).
Keep layering the torn strips. When the surface looks good to you, and there are enough strips of paper on there to be fairly sturdy, I’d apply polyurethane to make it waterproof. Add a couple layers.
Then bust the balloon. Voila! A strong-ish container that could be a vase (if you’ve waterproofed the inside, too) – or a toy holder (make the opening at the top really big, for that one) – or a place for the kids to keep all their pens and markers (make that one small) – and, well, you get the idea.
The colors that work in your house, a shape you like, a project that you and the kids can do together – and a way for them to see that THEY can make things that work. Love it!
You are going to love this – I found a wonderful, clear, easy-to-follow tutorial for making your own paper flowers. Take a look at these gorgeous decorative petals!


As shown in her tutorial, these are made with brown paper bags! And I really like the natural-paper look. But also – think how you could personalize these! Color paper, magazine pages, you name it. Your imagination’s really the limit here – and it’s practically cost free.
Or, use a pretty white textured paper – talk about DIY (and beautiful) wedding decorations!
The wonderful blog where I found this excellent tutorial is A Place For Us and she has some wonderful, charming, thought-provoking, useful posts there – it’s totally worth your time.
Do I sound like I’m really enthusiastic about this one? You’re right. This is a great find. Make some flowers – and check out that blog!
I saw this idea over on Pinterest and fell in love. Take any plain dish – and turn it into a personal gift or work of art 🙂

Actually I think the one in the pic has poetry written on it – or it might be Edgar Allen Poe (The Raven?). But no matter. Buy a simple plate at the thrift shop. Write your favorite muffin recipe around the edge using a Sharpie.
Then bake the plate for 30 minutes at 150 degrees in your oven (or more – I’ll doublecheck on that). Presto! The writing is permanent.
Then bake the muffins, load the plate up, and take them to your sweetie or favorite neighbor as a gift. You get to show off, you get to play with a new art form, and your sweetie gets his (or your) favorite muffins. This is a win!
P.S. And of course, what a darling way to make a personalized gift for someone special. An anniversary gift for your fave couple – with their names and wedding date. A birthday gift for your mom with a quote she loves. You get the idea!
P.P.S. Oops! I almost forgot to give credit! I couldn’t find the original source – but it was first pinned by the beautiful Marissa Villasana on her ‘Crafty’ page – and she has some wonderful ideas over there to check out!
I found this idea recently and I just love it. This could be wallpaper, carefully applied – but it’s not. It’s a stencil. And you can do it yourself 🙂

To make it even better, the stencil pattern is FREE! It’s from All Things Thrifty – a do-it-yourself and thrifty blog with tons of good ideas, tutorials, how-tos, and pics. Scroll down the page I’ve linked, to see this particular wall pic – but read the whole page to get lots of inspiration and ideas. AND she has a tutorial on how to make the stencil!
Now, I happen to love the one she shows in this pic – that it’s asymetrical, that it’s turquoise, just because that’s a great color, and it’s in a mostly white room – but those are details that appeal to me. Of course it could be in exactly the color you need – in whatever configuration works for you.
Yes, you could use wallpaper to achieve this look, especially if the background color of the wallpaper matched your own wall color. But you’d have to buy a whole roll of wallpaper (probably), in the exact right color, and, well, think how much better to just Do it Yourself.
Especially with a free stencil pattern. And a tutorial. And spending practically nothing. How cool is that?
So today I’m talking paper again – and a couple home-made gift wrap ideas I think will offer you some inspiration.

Do It yourself Gift Wrap Idea Number One
I love this one! You could use a store-bought doily, and that would be lovely over kraft paper, or fabric, or a plain box. Or instead of a doily, cut out a snowflake like you used to do when you were a kid (basically fold a piece of paper over and over and then cut out various shapes, and then unfold). Use a piece of colored or patterned paper and you’ll have wonderful homemade ‘lace’ like this one. It looks wonderful, and it doesn’t cost much (or anything, if you use old magazine pages or whatever you have around the house) – and it’s fun and individual.
and

Do It yourself Gift Wrap Idea Second Version
Now that is fun! Take any gift box, or a cereal box turned inside out, or a recycled box rescued from your local UPS store or printer. Find some markers or sharpies or paint brushes in your craft cupboard – and draw some pictures! If you have to paint or draw over some printing already on the box, so what? That could make it even more fun. If you’re not a great artist – so what? Draw circles or stars or just add scribbles with lots of colors. Ask your kids to draw their favorite pictures. (Okay, maybe put newspapers down on the kitchen table first.)
I’m sorry, Hallmark Corporation or whatever company it is these days that manufactures wrapping paper – but these are much better. They’re ecologically smart, they don’t cost much – and who has bunches of extra cash these days? – and even more important, they’re made with love and they’re PERSONAL.
Isn’t that what gift-giving is supposed to be about?
P.S. Oh! I must give credit where it’s due. I found both of these wrapping ideas – and more yummy ones to explore – over at Going Home to Roost, a wonderful blog full of do it yourself ideas, and recipes, and gentleness and healthy ideas and, well, it’s a lovely blog you ought to read.
This is going to be exciting. I’ve been experimenting with a new technique – and some super affordable Paper Jewels.
One of the reasons Paper Jewels are expensive to make is because they are incredibly time-consuming. There are approximately 30 steps – and hours of work, in small increments, to complete each piece. So I thought, there ought to be a way to make a more inexpensive Paper Jewels line that incorporates some fun kanji designs – and takes less time – and, well, costs less too!
Well there is, and here’s a sample:
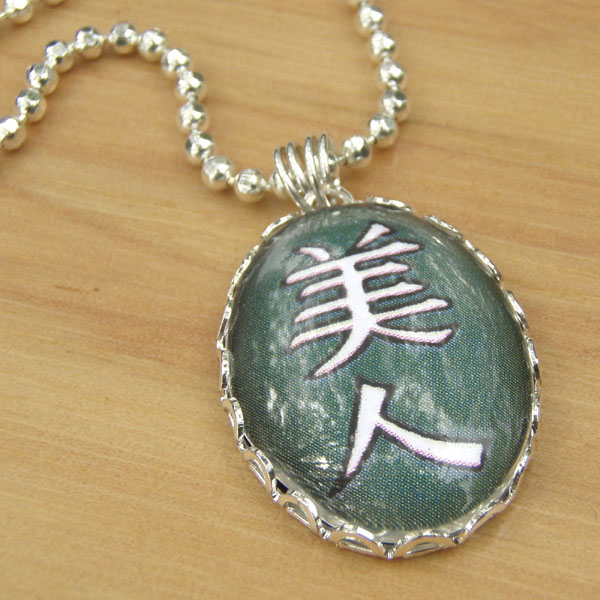
The kanji says Bijin, or Beautiful Woman (or hot babe!)
It makes a great gift for your sweetie. The paper design is behind a sheer glass cabochon – replacing layers of (time consuming) lacquer. The chain is an 18″ faceted ball chain, silver plated over brass – both easy to use and easy to trim to size if you like.
She’ll love it – and it costs way less than “traditional” Paper Jewels. Like, $25 versus $55 or so.
If you and she are on a budget, she’ll love the price thing, too 🙂
If you love paper as much as I do – you will appreciate these absolutely exquisite handmade ornaments. Ornaments – or wedding decorations – or, as the artist names them, “star urchins” 🙂


Handmade Paper Ornament or Wedding Decoratin from Kissadesign on Etsy
Aren’t those gorgeous? Yes they’d be lovely to decorate your handmade wedding. They’d also be equally wonderful – just because they’re so cool – decorating your desk! And if you like the white – but you’re even fonder of color, well she’s got them, all individually handmade, in lots of pretty colors. And in this fantastic rainbow color combo:

The shop is Kissadesign on Etsy – handmade folk art at its best.
I don’t know how she learned to do these so beautifully and affordably – but she has, and I’m just happy to have found them. Talk about a wonderful, eco-friendly, unique decoration or gift!
You know how I love paper. I’m always looking for interesting new works in paper – artwork, recycled decorating ideas, fashion even – why, I almost forgot one of the original purposes of paper – to write on!
Then I found these gorgeous handmade blank cards and you know, it reminds me how nice it is to get a handwritten note – and to send one.

Handmade Paper Lace Edge Cards from AlmondCrafts on Etsy
The shop is AlmondCrafts on Etsy, and the artist has some beautiful (and may I say, extremely affordable) work.
It makes me want to send, well, a love letter. These cards would be perfect!
P.S. Or hand-written wedding invitations. So much nicer than printed ones!
Do it yourself paper flowers – take a look at how wonderful these are!

These lovely blossoms are made from maps, or old book pages, or (I would think) any colorful paper / pages that need a new life. I found this wonderful idea over at Apartment Therapy which you know is one of my absolute favorite ideas-source. The article there even links to a tutorial!
And even better – if you love these flowers but don’t want to make them yourself – they also give the source of this yummy recycled goodness: and it’s an Etsy shop!
The shop is Greencycle Designs and she has wonderful work over there. Whether or not you decide to tackle making your own flowers (remember to use recycled pages!) you definitely want to go check out her shop, her prices are very reasonable and her work is gorgeous.
This is a win-win all the way around. Paper (which of course I love) and recycled – and Etsy – and do it yourself – wow!
Okay, “diamonds” is a little bit of an exaggeration. The teardrops on these earrings are faceted rhinestones – ‘diamonds’ for us ordinary mortals who have too many bills to pay but still love sparkly pretty earrings, maybe with the help of a discount coupon from sites as couponscollector.com! These earrings have the Japanese katakana (kanji) that says Eien, or Eternity – so they are actually wonderful for wedding earrings, or a first anniversary gift from a husband to his new bride 🙂
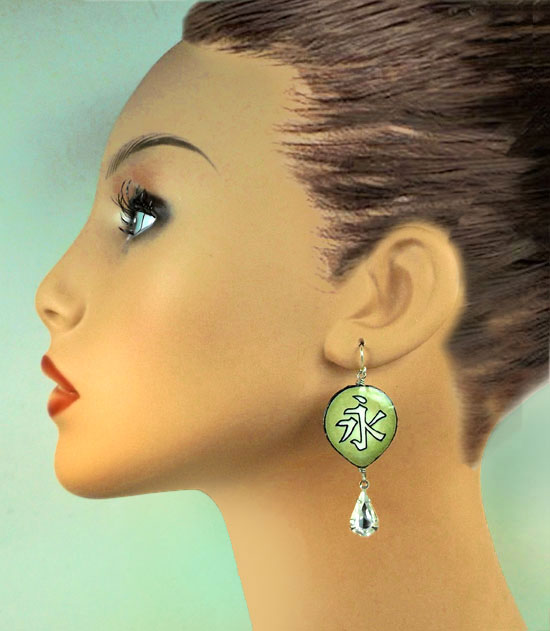
I actually just sold the pair pictured – and have started a new pair or two for the shop, so stay tuned. Or of course you can request a custom color for any Paper Jewels. Just ask!
PS Diamonds are the birthstone for April – so these earrings (or others with crystal ‘diamonds’) are especially appropriate. Just saying 🙂
|
Coolness
DIY
Eco friendly
Gardening
Home Decor
Indie / Design
Thrifty
vintage
|

